Recording a guitar might seem difficult (and in a sense it is). But if you use this set of basic checks, you can greatly improve your results.
When browsing Soundcloud music to find interesting artists to work with, I’ve come across some really great songs. While having a great deal of potential, some of those have issues that can stop their potential audience from fully appreciating the music.
I’d like to focus on the guitarists among you now. Do you want to start recording guitars at home? In this article we’ll look at some important aspects to take into account. These will hopefully help you to find a great sound with some simple steps to follow.
Microphone placement
This is actually a topic that deserves it’s own blog post. Just a few guidelines though:
- Acoustic: 1 (or maybe 2) microphone(s), directed at the strings, sound hole and/or bridge.
- It’s generally preferable to use just 1 microphone and take your time to find the best sounding position. When you attempt to blend multiple microphones in the mix, you always get phasing problems to deal with.
- If you do choose to use 2 microphones, try keeping the distance of the microphone to the strings equal, thus diminishing phasing issues.
- Electric: 1 or 2 different microphones on the speaker cabinet.
- Distance to sound source: depending on the sound of the room you record in, you can experiment with this.
- Longer distance: more of the room sound will reach the microphones, but with a more natural result.
- Shorter distance: less room sound, can sometimes give more definition to the sound.
- You can also use a combination of close and far mics to capture direct and room sound separately. In that case, you can even point the ‘room mic’ away from the guitar to pick up less of the direct sound.
- Most important: do some test recordings, try different mics and positions, and find out what sounds best to you. In other words: EXPERIMENT until you find a sound you like.

Getting the sound right at the source
Try to imagine the sound you need to complement the other instruments in the arrangement. E.g. a thinner guitar sound, focused on a certain frequency band can be beneficial in a fuller arrangement (for example with heavy bass and drums) versus a full sound when recording just guitar + vocals.
Compare for example the sound of a Queens of the Stone Age guitar part to the guitar sound on Jeff Buckley’s ‘Hallelujah’. The former is deliberately recorded with a whole lotta gain in the mid frequencies, while the latter uses a warmer, more balanced frequency response for the guitar.
Imagining the right sound can be a lot easier if you already have guide tracks/demo recordings for the other instruments. Then you can immediately check how the recordings sound in full context.
A good rule of thumb is ‘record like there is no mixing process’. Try to get the sound right at the source. Use your amp’s E.Q., guitar tone control/pickup selection, try altering mic placement in relation to your cab’s speakers, altering mic distance, move the amp near a corner for more bass, try putting it on a chair for less bass (each surface near the source adds some extra low-end).
As for effects: minimize those in the recording process. If you have specific effects that you want in the final recording, record the clean signal and the wet signal separately. Your mixing engineer will thank you : ) A simple delay for example is easy to add in the mix, but impossible to remove from the recorded signal if deemed too much or inappropriate.
Room acoustics
Most rooms have the shape of oblong boxes that by themselves sound very unnatural and, well, ‘roomy’. Unless you have a professional recording studio, chances are that the acoustics will be less than optimal in your home studio.
The room acoustics can be masked in some ways:
- Use whatever you can find (mattresses, duvets, cushions, …) to dampen reflections between any parallel planes in your room. The worst issues will arise where two opposite and parallel naked surfaces reflect the sound, which creates a fast ‘flutter’ echo. (this can be heard by standing between 2 such parallel planes and clapping your hands once). On top of that, certain frequencies will get boosted and others diminish. This results in an unnatural coloration of your recorded sound. Full volumes have been written on the subject of acoustics, it’s a full-blown science. But keep in mind that no perfect room exists and some simple steps can improve the result greatly. If you are interested in learning more, I can recommend this site as a great place to start.
- Positioning of the sound source in the room can make a huge difference. E.g. avoid placing the amplifier close to a wall to diminish direct reflections, as these can introduce frequency response imbalances that will shape the sound in an unwelcome way.
- The room can be eliminated fully for electric guitars by using D.I. + plugins (the quality has improved much over the years, even for free plugins). Hardware cabinet emulators exist to record the output of your amp head. Do NOT plug the (speaker) output of your amp head directly into a normal audio interface!
- D.I. means ‘direct input’, i.e. recording the electric guitar’s signal as-is. This can be achieved by plugging the guitar directly into your audio interface’s instrument input. Alternately, you can use a dedicated ‘D.I. box’. This is a low-cost piece of gear that can be used to convert an instrument (or ‘line-level’) signal to a microphone-level signal. By using this, you can use a microphone input to record your guitar signal. Then use a guitar amp simulator and a cab simulator software plugin to get the sound you like.
Proper guitar tuning
This is not always obvious to the untrained ear, but a slightly out-of-tune guitar can severely hurt the listening experience for your audience. Even if they won’t know that it’s the tuning of the guitar specifically that’s off, they WILL notice that something somehow doesn’t sound right. So make sure you do everything to get the tuning right before you hit ‘record’.
- Low-budget guitars have a tendency to sound off dependent on what notes you play. Even the playing style can influence tuning. But even on a cheap guitar and with an unconventional playing style, you can use a few techniques to get a good tuning for your recordings.
- Use a good tuner (or even a VST plugin), that can tune any note, not just the open strings. (the strings bend a little when pressing on the fret board)
- Tune while fretting the string at fret #5, or use the part of the fret board that you will be mostly using for the recording.
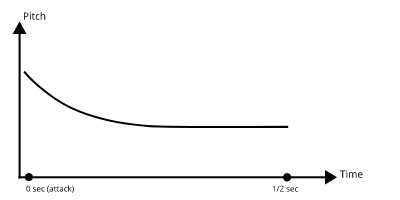
- Tune part-specific: tune on attack or tail depending on long/short notes When striking a note on the guitar, your tuner will show a slightly high pitch at the start of the note. When you let it ring, the frequency will drop over time. That’s why you should consider the part you are about to record. Does it have many long notes, or is it a fast part with a lot of short notes. For long notes, tune it so that the longer tail of the note is correct, for shorter notes, focus on the first part ar ‘attack’ of the note. No need to re-tune for separate notes, just evaluate what part of the note is most prevalent in the piece you want to record.
Guitar setup
- New strings: new strings add clarity, definition and sparkle to your guitar sound. In most cases this is preferred for recording. But sometimes the duller, softer sound of older strings can be preferred for certain parts. Leave some time between changing strings and recording, as new strings tend to de-tune quickly while still ‘settling’.
- Choice of picks: try out different thickness and materials. Also select a different pick based on the type of guitar part you want to record. It matters more to the final sound of the guitar than you might suspect.
- String action: this is the distance between the strings and the fretboard. Too much action and the strings will detune more over the fretboard. Too little action and ‘buzzing’ will start to occur when the strings vibrate against adjacent frets. Your playing style will also determine what action range is best for you. A softer, gentler playing style allows for a smaller action with less chance of buzzing occurring. (Setting up a guitar is beyond the scope of this article. If you want to know more you can check this Wikihow article.)
Conclusion
This is by no means a complete list of guitar recording techniques. But now you know some of the basics for recording your guitar sound properly. Thus you will avoid some of the common pitfalls when recording guitars at home.
Any questions, suggestions or other feedback? Leave your comment below or drop me an email. Till next time!