
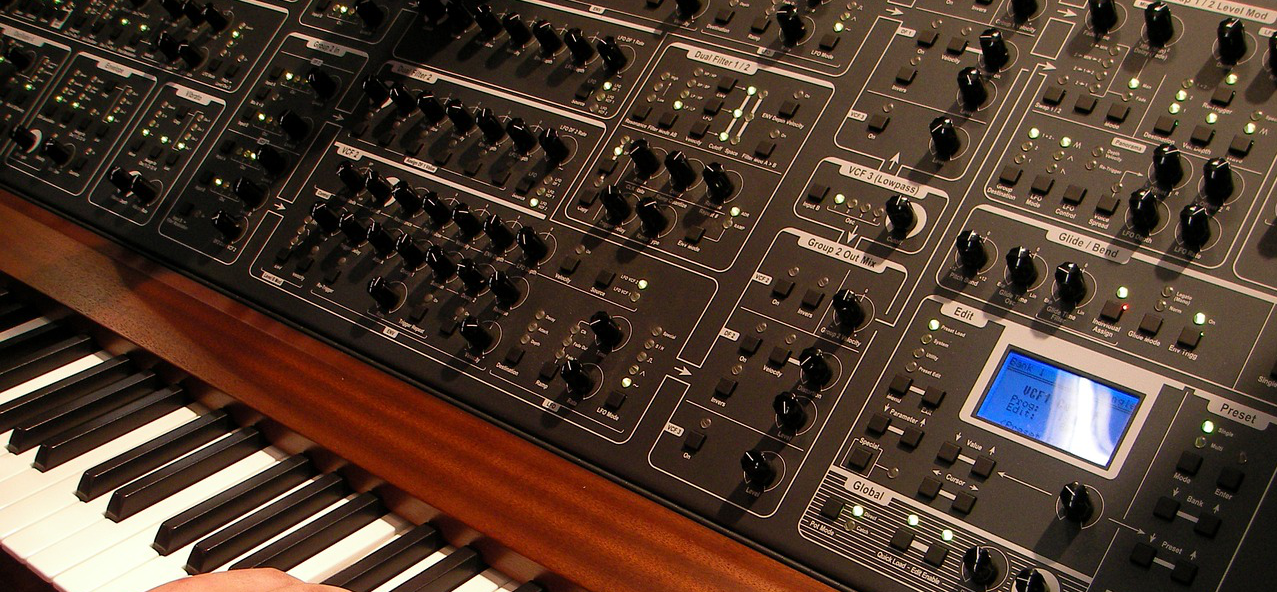
The synthesizer has been an important part of popular music since the 1970s. Today, it is omnipresent, and not just in the obvious genres like EDM, R&B & Rap music. Styles like alternative rock and indie pop equally make extensive use of this versatile instrument. Think of great bands like Queens of the Stone Age, the War on Drugs, Radiohead, Muse, Tame Impala, …
Most artists that create music today can use synthesizers to extend their sound palette. Synths can bring atmosphere, excitement and variety to music.
If you’ve ever wanted to learn about the many possibilities of this instrument, but didn’t know where to start: you’ve come to the right place!
A free synthesizer to start within minutes
For this article, I will use a free synth plugin from Togu Audio Line (TAL): a plugin company that offers some good quality plugins.
- The Elek7ro is a free analogue style basic synthesizer. The synth is no longer supported by the developer, but it sounds great, has all basic features and a simple interface.
- The NoiseMaker is the newer free synthesizer plugin from TAL. It has more features like an effects section and a complex envelope editor. This one has limited support as stated on the TAL website.
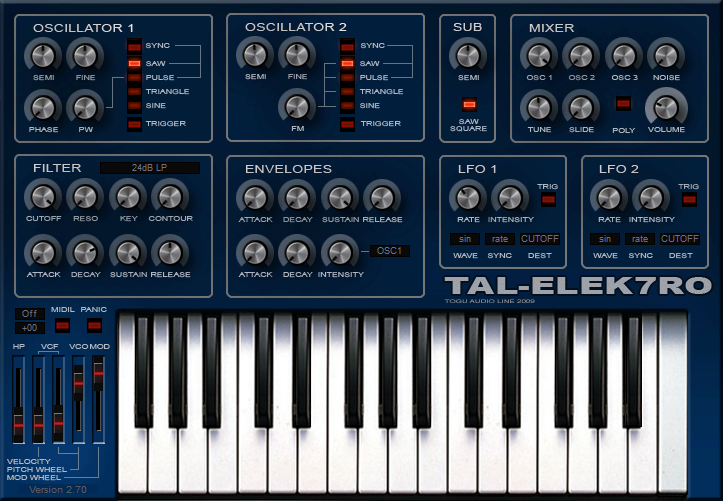
I chose the simpler TAL-Elek7ro synth for this article. It’s not perfect and no longer supported, but it has all the basic features on a compact interface. With the basics teached in this article you can learn to work with other synths, like the TAL-NoiseMaker, quickly.
You can follow along and test the concepts explained here. Just install the VST plugin into your DAW’s plugin folder. (For Reaper users: this is the ‘Plugins’ folder in the installation directory. You can add subfolders in the plugins folder, Reaper will find the plugins on restart, or with Options > Preferences > Plugins-VST > ‘Re-scan’.)
Download link: https://tal-software.com/products/tal-elek7ro
Read this article if you want to get started with Cockos’ Reaper DAW.
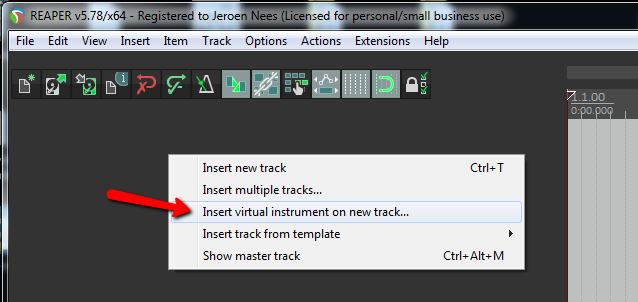
To add an instance of the synthesizer in Reaper: right-click the track section and choose ‘Insert virtual instrument on new track…’. Choose the TAL-Elek7ro in the pop-up list.
Synthesizer sub-sections
You will find these or similar button groups in most synths and synth plugins.
- Oscillators: The controls for the sound sources. This particular synth has 4 sound sources: 2 main oscillators, a sub-octave oscillator and a random noise generator.
- Mixer/master: Control the balance between sound sources and some global settings
- Filter: Shape the sound by altering the frequency content
- Envelopes: Control how a note evolves over time
- LFOs: ‘Low Frequency Oscillators’ modulate parameters to get more movement
The Mixer
Like a small mixing desk, this section allows you to set levels for the separate sound sources.
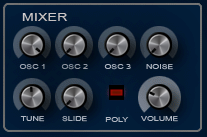
The top 4 buttons control the volumes of main sound sources: oscillator 1 & 2. Osc 3 is the ‘sub’ oscillator and ‘Noise’ is an extra source that outputs random noise.
The bottom 4 buttons are general controls:
- Tune: global tuning of the synth
- Slide: Glissando / portamento effect: the pitch will ‘slide’ to the new note instead of instantly playing the chosen pitch. Choose the correct portamento option in the small menu to the left of the keyboard.
- Poly: enable this for playing more than one note at the same time
- Volume: Global output volume of the synth
The Oscillators
An oscillator is a sound source, producing a waveform.
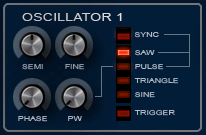
Controls on oscillator 1:
- Semi: coarse tuning of the oscillator (in notes/semitones). On other synths this can be called pitch/tune/octave/coarse..
- Fine: fine tuning of the oscillator (in cents/microtones)
- Phase: shifts the waveform phase. (note: Doesn’t seem to work in this plugin; no need to worry about phase for now..)
- PW: ‘Pulse width’ only relevant for the ‘pulse’ waveform.
Basic oscillator wave-forms:
- Sine: the most basic sound, consists of exactly 1 frequency. Soft(low) or thin(high) sound. Think of: telephone sounds, flute-like sound, simple beep sounds.
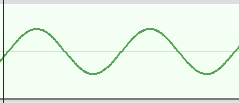

The sine wave - Triangle: basic frequency with some added overtones, somewhat richer
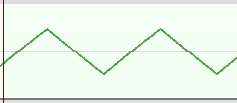
- Sawtooth: ‘sharp’ sound, even harmonics
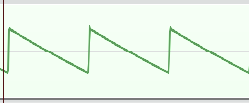

The sawtooth wave - Square: ‘full’ sound, odd harmonics (=pulse with 50% pulse width)
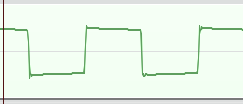
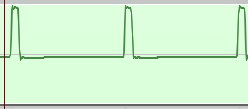
- Pulse: like a square, but with adjustable width of the pulse. On this synth: PW (pulse width) at 0 means 50% (i.e. square), at max value, the pulse is narrow. A narrow pulse wave sounds ‘thin’, a bit oboe-like. Try moving the PW button while a note is playing. It’s an interesting effect!
Test these sounds to get familiar with them. Put the ‘Osc1’ button in the mixer section at max value (clockwise), set Osc2, Osc3 and Noise to 0 (counter-clockwise). Now you’re only hearing oscillator 1. With the filter in ‘LP’ mode, set the cutoff button to max.
The basic waveforms square and triangle can sound a bit harsh in their pure form, that’s where the filter section comes in handy.
Filter Section
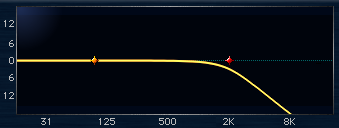
In my opinion, this is the most fun part of the synthesizer. To ‘soften’ the harsher sounds like the triangle waveform, we can cut off some of the higher frequencies from the sound with a low pass filter. A filter to remove low frequency content is called high pass filter. The band pass filter cuts off both high and low frequency content.
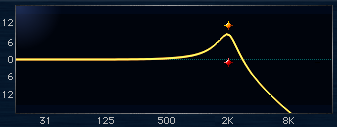
The filter can also add a ‘resonance’ boost at the cut-off frequency. This results in a ‘ringing’ sound. The resonance per se is not that exciting, but if you modulate the cut-off frequency (by LFO, envelope or knob -twiddling) the effect becomes interesting.
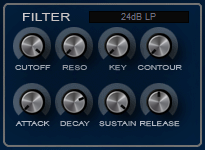
An overview of the controls in this section:
- Filter type menu: choose LP, HP or BP function. Also choose the ‘slope’: a higher ‘dB’ value means a steeper roll-off of the frequency content. Here, ‘dB’ is short for ‘Decibels per octave’.
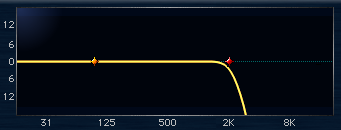
- The frequency cutoff: the point at which the filter cuts off.
- The filter resonance: the amount of frequency boost around the cutoff frequency
- Key: short for ‘keyboard follow’: the cutoff frequency will vary with note pitch. Play a higher note, the cutoff will be higher.
- Contour: determines how much the filter cutoff will follow the filter envelope, set by the next row of ADSR buttons.
- ADSR envelope (4 knobs): evolution of the cutoff frequency over time. See the next section for an explanation of (ADSR) envelopes.
Envelopes (ADSR)
Envelopes modulate the sound of a note over time. Amplitude and filter frequency are typically modulated with an envelope. Usually the envelopes can also be routed to influence different parameters.
ADSR stands for Attack, Decay, Sustain, Release.
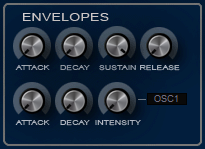
The first row of buttons represents the amplitude (volume) envelope:
- Attack: the time it takes for a note to reach the full volume after the key is pressed.
- Decay: the time it takes for the volume to drop to ‘Sustain’ level.
- Sustain: the volume the note sustains while the note keeps sounding (key remains pressed).
- Release: the time it takes for the note to die out after the key is released.
The second row of buttons represents a simpler ‘AD’ (attack & decay) envelope and can be assigned to different destination parameters. The envelope value will build up to max and then immediately decay to zero.
Possible target parameters are OSC (pitch), PW (pulse width for pulse waveforms) and FM (frequency modulation).
The ADSR buttons in the filter section control the envelope for frequency cutoff.
LFO’s
Like envelopes, LFO’s (Low Frequency Oscillators) are used to modulate sound parameters like volume, pitch, filter frequency, pulse width, …
The frequencies used are usually below the audible spectrum (<20Hz) and result in rhythmic and/or pulsating modulations.

The rate button sets the frequency. Can go from multiple cycles per second to multiple seconds per cycle. Intensity determines by how much the target parameter is modulated.
The wave menu sets the waveform used. Apart from the same forms as used in normal oscillators, on this synth we also have S&H (sample and hold) and noise.
- S&H: outputs a new random value each cycle. Nice for retro sci-fi sounds when sent to the oscillator pitch or filter frequency (try it!).
- Noise: a continuously changing random value.
With the sync menu, you can set the rate to a fixed value based on the time signature (tempo) used in the DAW. ¼ for fourth notes, ¼. for dotted fourths (= a fourth plus an eighth), ¼ T for fourth ‘triplets’ (a subdivision in 3 beats on a four beats time signature)
The dest menu determines the destination parameter that the LFO modulates:
- Cutoff: modulates the filter cutoff frequency, for that typical ‘wobble’ or ‘auto-wah’ effect.
- OSC: modulates the oscillator pitch (osc1, osc2, or both) (‘vibrato’ effect)
- PW: modulates the pulse width of a ‘pulse’ type oscillator. A cool synth effect, for example for ‘Reese’ bass or animated lead sounds.
- FM: modulates the intensity of frequency modulation between the 2 oscillators.
- Pan: modulates left-right balance.
- Volume: modulates the output volume: ‘tremolo’ effect.
Other synthesis types
The most common synthesis type is subtractive synthesis. That’s the type discussed in this article. It’s called subtractive because in most cases a complex waveform is the source and then frequencies are subtracted by applying a filter.
A description of some other synthesis types not covered in this article:
- FM synthesis: One oscillator’s output controls the frequency of a different oscillator. Several oscillators can be combined like this to get a more complex waveform. Most synthesizers have some form of FM functionality built in. As does the TAL-Elek7ro. Results in sounds with inharmonic overtones, like metallic or bell sounds.
- Wave-table synthesis: the oscillator is a looped sound wave. Putting a different sample in the oscillator changes the character of the oscillator.
- Granular synthesis: The oscillator loops a small section from a longer sound wave. Create evolving timbres by modulating properties of the repeated loop: position, length, playback speed, …
- Additive synthesis: Combine several basic waveforms, usually sine waves, into a more complex sound.
- Physical modeling synthesis: Simulates acoustical physics processes for realistic or experimental sounds.
- …
Although using different techniques, most of these other synth types still use ADSR, LFO and filters like discussed in this article.
Start experimenting!
Now you know about the most important and common subsections found on synthesizers. Start experimenting as the fastest way to learn! You’ll recognize most of these concepts in other synthesizers as well.
I’d love to hear about your first steps into the world of synths! Please leave your questions or remarks in the comments section below. Or send me an email ( wooolfsounds@gmail.com )
Thanks for reading and till next time!